Portal > SmartBuild > Notifications
The Notifications page enables you to tie together the Events and Buttons you have created and configured and assign them to various devices, triggering the kinds of notifications they can provide. Events and Buttons can be assigned to multiple devices, and devices can be configured to respond to multiple Events and Buttons.
The page is accessed by clicking Notifications in the SmartBuild menu pane. The default view is the View by Destination tab.
Notifications Page Definitions
The following definitions summarize concepts you will encounter in this section.
Table 20: Notifications page definitions
|
Term |
Definition |
|---|---|
|
Button |
A button is created in Hardware and is then shown on the SmartScreen Client. When pushed the status changes and an Event is fired. |
|
Event |
An Event describes something that happens in the PINpoint system which can then be used to trigger Notifications. |
Tab Views
View by Destination
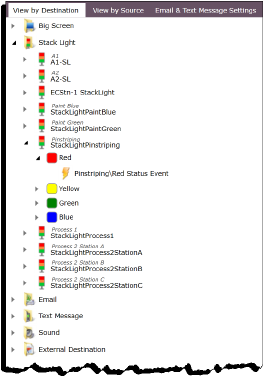
The View by Destination tab is the default view when the Notifications page opens. It displays folders that organize notification devices by type. Expanding a folder displays the instances of that notification type that are currently available in PINpoint. Those instance can be expanded to display the Events and Buttons that are currently assigned to them. In the example below, the Stack Light at the Pinstriping work station has had the Pinstriping\Red Status Event assigned to its Red light.
Figure 169: View By Destination

Table 21: Notification Types
|
Notification Type |
Description |
|---|---|
|
BigScreen |
When expanded, this presents a list of the BigScreen Devices configured in PINpoint. Expanding any of them, in turn, presents Backgrounds and Items to which Buttons and Actions can be assigned. |
|
Stack Light |
When expanded, this presents a list of the Stack Light Devices configured in PINpoint. Expanding any of them, in turn, presents the lamp colors to which Buttons and Actions can be assigned. |
|
|
When expanded, this presents a list of the Emails configured in PINpoint. Expanding any of them shows which Events and Buttons are assigned to it. Clicking an Email enables you to add Events and Buttons to it, as well as edit its setup in the Details pane. When the Email folder is selected, it is possible to create and configure a new Email message. |
|
Text Message |
When expanded, this presents a list of the Text Messages configured in PINpoint. Expanding any of them shows which Events and Buttons are assigned to it. Clicking a Text Message enables you to add Events and Buttons to it, as well as edit its setup in the Details pane. When the Text Messages folder is selected, it is possible to create and configure a new Text Message. |
|
Sound |
When expanded, this presents a list of the Sounds configured in PINpoint. Expanding the any of them shows which Events and Buttons are assigned to it. Clicking a Sound enables you to add Events and Buttons to it, as well as edit its setup in the Details pane. When the Sound folder is selected, it is possible to create and configure a new Sound. |
|
External Destination |
When expanded, this presents a list of the External Destinations configured for Events and Buttons. |
View by Source
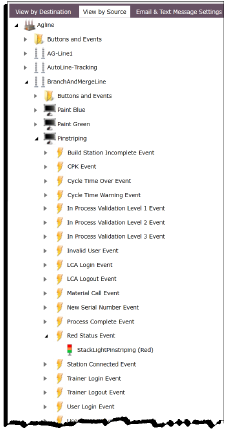
The View by Source tab displays folders that organize Events and Buttons according to the facilities, Lines, and Stations for which they have been created. Expanding a Station or Buttons and Events folder displays the types of Events available. Those types can be expanded to display the devices that the Event has been assigned to. In the example below, the StackLightPinstriping(Red) Stack Light Device is shown in the Red Status Event category of the Pinstriping station, signifying that this Event has been assigned to that device.
Figure 170: View by Source
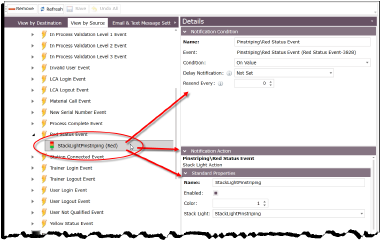
In addition, selecting a device populates the Details pane with the attributes appropriate to that device, enabling you to view and edited them (note that editing these details necessitates clicking the Save button at the top of the interface in order to apply them).
Figure 171: Source Details
Email & Text Message Settings
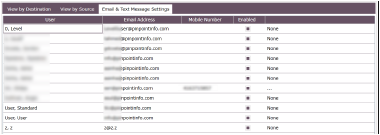
The Email & Text Message Settings tab displays PINpoint users available to be sent text and/or email notifications by Event and Button triggers. The interface enables you to enable and disable users for use by notifications, and to set the line and shift they work on, if any.
Figure 172: Email and Message settings
Event Creation and Configuration
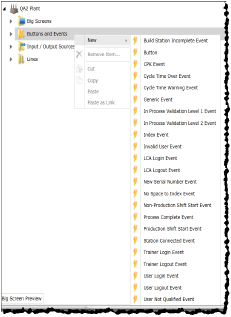
PINpoint includes an extensive range of production line events that either affect production or are typically brought to the attention of people managing it. Events (as well as the Buttons that can be associated with them) are created and modified point using the Hardware page in SmartBuild, and grouped in various Buttons and Events folders.
Figure 173: Event Types
For information on creating and configuring Events and Buttons, see Heading3.
Creating New Notification Destinations
Using the Notifications page, you can creating and configure new Emails, Text Messages, Sounds, and External Destinations.
NoteIt is not possible to create new Sound Devices, Stack Light Devices, or BigScreen Devices using the Notifications page, however. These are hardware-specific and must be created and configured in the Hardware page. For instructions on doing so, see Heading3 in the SmartBuild chapter.
Creating a new Email
To create a new Email, follow these steps.
1.On the SmartBuild panel, select Notifications. The Notifications workspace opens and displays your facilities.
2.In the View by Destination tab, click on the Email folder to make it active.
3.Click the Add Item button at the top of the page. The New Email dialog opens.
4.Type a name for the new Email and click OK. The new Email is displayed in the hierarchy of the Email folder
5.Click on the new Email to make it active. Its configurable attributes populate the Details pane.
Figure 174: Email details
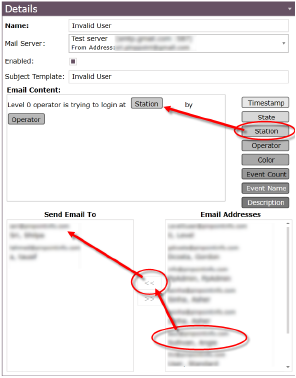
6.Configure the following attributes:
Table 22: Email Details Attributes
|
Attribute |
Description |
|---|---|
|
Name |
This is the provided at the time the Email was created. It is possible (though not necessary) to change it using this field. Changing the name here is automatically reflected in the Email folder. |
|
Mail Server |
Use this drop-down menu, populated with mail servers set up in PINpoint, to select the mail server you want to use. |
|
Enabled |
Placing a check in this box enables the Email. Clearing the box disables the Email. |
|
Subject Template |
Type a subject header for the Email. |
|
Email Content |
Type the body of the Email in the Email Content field. As well, you can drag and drop the following variable buttons, located to the right of the field, into the Email Content field: •Timestamp: This is the time the Email was sent. •State: This is the state of the Event triggering the Email (0, 1, or 2). •Station: This is the station from which the Email is sent. •Operator: This is the ID of the operator sending the Email. •Color: This is the color of the Event. •Event Count: This is the count value of the Event. •Event Name: This is the name of the Event triggering the Email. •Description: Any additional information for the event, such as the reason they it was selected, or in the case of something like an Operator Login event, the operator name. |
|
Send Email to |
The Email Addresses field contains the email addresses of the users in PINpoint. Select the ones to which this Email should be sent (you can do this one at a time, or CTRL+click as many as apply to select them all at the same time), and click the << button to move them to the Send Email to field. You can use the >> button to send any selected address you want to exclude back to the Email Addresses field. |
7.When you have finished configuring the Email, click Save.
Creating a new Text Message
To create a new Text Message, follow these steps.
1.On the SmartBuild panel, select Notifications. The Notifications workspace opens and displays your facilities.
2.In the View by Destination tab, click on the Text Message folder to make it active.
3.Click the Add Item button at the top of the page. The New Text Message dialog opens.
4.Type a name for the new Text Message and click OK. The new Text Message is displayed in the hierarchy of the Text Message folder.
5.Click on the new Text Message to make it active. Its configurable attributes populate the Details pane.
Figure 175: Text Message Details
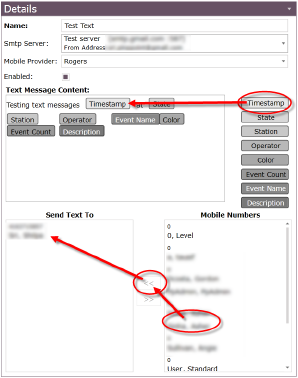
6.Configure the following attributes:
Table 23: Text Message Details Attributes
|
Attribute |
Description |
|---|---|
|
Name |
This is the provided at the time the Text Message was created. It is possible (though not necessary) to change it using this field. Changing the name here is automatically reflected in the Text Message folder. |
|
Smtp Server |
Use this drop-down menu, populated with SMTP servers set up in PINpoint, to select the server you want to use. |
|
Mobile Provider |
Use this drop-down menu, populated with mobile telephone service providers to select the mobile provider you want to use to send this message. |
|
Enabled |
Placing a check in this box enables the Text Message. Clearing the box disables the Text Message. |
|
Text Message Content |
Type the body of the Text Message in the Text Message Content field. As well, you can drag and drop the following variable buttons, located to the right of the field, into the Email Content field: •Timestamp: This is the time the Text Message was sent. •State: This is the state of the Event triggering the Text Message (0, 1, or 2). •Station: This is the station from which the Text Message is sent. •Operator: This is the ID of the operator sending the Text Message. •Color: This is the color of the Text Message. •Event Count: This is the count value of the Text Message. •Event Name: This is the name of the Event triggering the Text Message. •Description: Any additional information for the event, such as the reason they it was selected, or in the case of something like an Operator Login event, the operator name. |
|
Send Text to |
The Mobile Numbers field contains the mobile numbers of the users in PINpoint. Select the ones to which this Text Message should be sent (you can do this one at a time, or CTRL+click as many as apply to select them all at the same time), and click the << button to move them to the Send Text to field. You can use the >> button to send any selected address you want to exclude back to the Mobile Numbers field. |
7.When you have finished configuring the Text Message, click Save.
Creating a new Sound
To create a new Sound, follow these steps.
1.On the SmartBuild panel, select Notifications. The Notifications workspace opens and displays your facilities.
2.In the View by Destination tab, click on the Sound folder to make it active.
3.Click the Add Item button at the top of the page. The New Sound dialog opens.
4.Type a name for the new Sound and click OK. The new Sound is displayed in the hierarchy of the Sound folder.
5.Click on the new Sound to make it active. Its configurable attributes populate the Details pane.
Figure 176: Sound Details
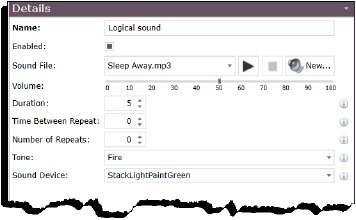
6.Configure the following attributes:
Table 24: Sound Event Attributes
|
Attribute |
Description |
|---|---|
|
Name |
This is the provided at the time the Sound was created. It is possible (though not necessary) to change it using this field. Changing the name here is automatically reflected in the Sound folder. |
|
Enabled |
Placing a check in this box enables the Sound. Clearing the box disables the Sound. |
|
Sound File |
This line presents two options. a.The drop-down menu enables you to select from among the sound files already uploaded to PINpoint. The arrow and square buttons associated with it enable to you to listen to the sound file and to stop playback, respectively. b.The New... button opens a dialog that enables you to navigate to a sound file and upload it to PINpoint for use in the Sound File drop-down menu. (See Heading5 below for instructions.) |
|
Volume |
Use this sliding scale to set the volume at which this sound will be played over the sound device. |
|
Duration |
This is the amount of time, in seconds, the sound is played in a single cycle. You can type a value into this field, or use the up and down arrows to change the value in increments of one second. |
|
Time Between Repeat |
This is the amount of time, in seconds, between repetitions of the sound. If unset or set to "0", the sound will play for the designated duration. You can type a value into this field, or use the up and down arrows to change the value in increments of one second. |
|
Number of Repeats |
This is the number of times the sound will be repeated for the triggering event. You can type a value into this field, or use the up and down arrows to change the value in increments of one. |
|
Tone |
Use this drop-down menu to select a tone to accompany the sound. The choices are: •Off (no tone) •Fire •Emergency •Ambulance •Beep, Beep, Beep •Continuous. |
|
Sound Device |
Use this drop-down menu to select the Sound Device, from among those configured in PINpoint, at which this sound will be played. |
If you want to add a new sound to use with the Sound you are creating, follow these steps.
1.In the Details pane, click the New... button in the Sound File row.
Figure 177: New button in Sound Details
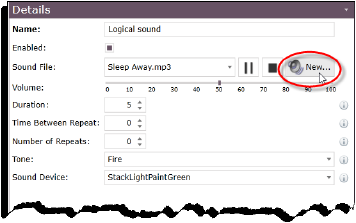
The New Sound File dialog opens.
Figure 178: New Sound File dialog
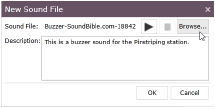
2.Click the Browse button. A Windows Explorer window opens, enabling you to navigate to the sound file you want to use.
3.Navigate to and select the sound file you want to use (acceptable formats are WAV and MP3).
4.Click OK. The name of the file populates the Sound File field.
•Optionally, you can use the arrow button to preview the sound file.
•Optionally, you can type a description of the sound file.
5.Click OK The sound file is uploaded and becomes available in the Sound File drop-down menu.
6.When you have finished configuring the Sound, click Save.
Creating a new External Destination
An External Destination represents the PLC (programmable logic controller) that manages the behavior of a device and its inbound and outbound communications. Creating one in PINpoint enables the system to communicate, by OPC protocols, various Events to the PLC and affect some aspect of the behavior of the device.
To create an External Destination, follow these steps.
1.On the SmartBuild panel, select Notifications. The Notifications workspace opens and displays your facilities.
2.In the View by Destination tab, click on the External Destination folder to make it active.
3.Click the Add Item button at the top of the page. The New External Destination dialog opens.
4.Type a name for the new External Destination and click OK. The new destination is displayed in the hierarchy of the External Destination folder
5.Click on the new External Destination to make it active. Its configurable attributes populate the Details pane.
6.Use the Destination drop-down menu to select a Data Item as a target for the notification to be passed to.
NoteIn order for items to appear in the Destination list, they must be created and configured in the SmartBuild > Advanced page in the hierarchy of the Event Manager. For more information, see Heading2 in the How Do I... chapter of this manual.
7.Click Save to commit your changes.
8.Click Refresh to load the External Destination into the PINpoint system.
For information on setting up and configuring an External Destination, see Heading2 in the How Do I... chapter of this manual.
Adding Events to Notification Destinations
Once the Events and Buttons are created and notification destinations are configured, they need to be brought together. Events and Buttons are applied to the various notification destinations to arm and actuate the Andon system.
The assignment of Events and Buttons to notification destinations is accomplished in the Notifications page of SmartBuild.
Adding Events and Buttons to a Stack Light
To add an Event to a Stack Light, follow these steps.
NoteThese steps are exactly the same for adding Buttons.
1.In the View by Destination tab, expand the Stack Light folder. The available Stack Lights are displayed.
2.Expand the Stack Light to which you want to add an Event. The colored lamps available on the light are displayed. These lamps themselves can be expanded to show which, if any, Buttons and Events have already been assigned to them.
3.Click on the lamp color to which you want to add an Event to make it active.
4.Click the Select Event(s) button at the top of the page. The Select Event(s) to [lamp color] dialog opens.
Figure 179: Add Event(s) to Stack Light Steps
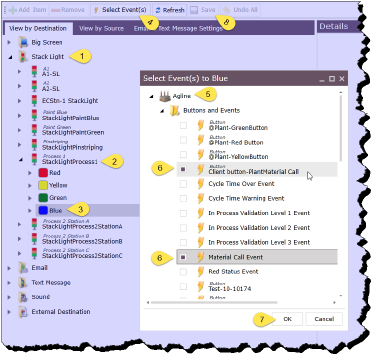
5.Expand the facility hierarchy. The Buttons and Events folder and the available lines are displayed.
Depending on where the Event or Button you want to add resides, you can:
a.Expand the Buttons and Events folder of the facility itself;
b.Expand a Line to view and expand its Buttons and Events folder; or
c.Expand a Station to view its Buttons and Events
6.Select a single Event by clicking it, or multiple Events by clicking their associated check boxes.
7.When you have finished selecting the Event(s) you want to add to the light, click OK. The Event or Events are added to the hierarchy of the lamp.
8.Click the Save button at the top of the page to make your changes permanent.
Adding Events and Buttons to an Email
To add an Event to an Email, follow these steps.
NoteThese steps are exactly the same for adding Buttons.
1.In the View by Destination tab, expand the Email folder. The available Emails are displayed.
2.Click on the Email to which you want to add an Event to make it active. Emails themselves can be expanded to show which, if any, Buttons and Events have already been assigned to them.
NoteThe Details pane populates with the configurable attributes of the Email. You have the option of editing the Email message, destination, and so on, using the Details pane.
3.Click the Select Event(s) button at the top of the page. The Select Event(s) to [Email name] dialog opens.
Figure 180: Add Event(s) to an Email Steps
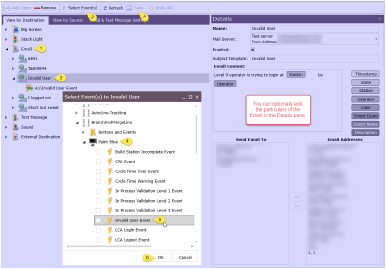
4.Expand the facility hierarchy. The Buttons and Events folder and the available lines are displayed.
Depending on where the Event or Button you want to add resides, you can:
a.Expand the Buttons and Events folder of the facility itself;
b.Expand a Line to view and expand its Buttons and Events folder; or
c.Expand a Station to view its Buttons and Events
5.Select a single Event by clicking it, or multiple Events by clicking their associated check boxes.
6.When you have finished selecting the Event(s) you want to add to the Email, click OK. The Event or Events are added to the hierarchy of the Email.
7.Click the Save button at the top of the page to make your changes permanent.
Adding Events and Buttons to a Text Message
To add an Event to a Text Message, follow these steps.
NoteThese steps are exactly the same for adding Buttons.
1.In the View by Destination tab, expand the Text Message folder. The available Text Messages are displayed.
2.Click on the Text Message to which you want to add an Event to make it active. Text Messages themselves can be expanded to show which, if any, Buttons and Events have already been assigned to them.
NoteThe Details pane populates with the configurable attributes of the Text Message. You have the option of editing the Text Message message, destination, and so on, using the Details pane.
3.Click the Select Event(s) button at the top of the page. The Select Event(s) to [Text Message name] dialog opens.
Figure 181: Add Event(s) to a Text Message Steps
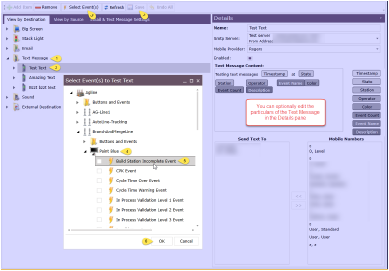
4.Expand the facility hierarchy. The Buttons and Events folder and the available lines are displayed.
Depending on where the Event or Button you want to add resides, you can:
a.Expand the Buttons and Events folder of the facility itself;
b.Expand a Line to view and expand its Buttons and Events folder; or
c.Expand a Station to view its Buttons and Events
5.Select a single Event by clicking it, or multiple Events by clicking their associated check boxes.
6.When you have finished selecting the Event(s) you want to add to the light, click OK. The Event or Events are added to the hierarchy of the Text Message.
7.Click the Save button at the top of the page to make your changes permanent.
Adding Events and Buttons to a Sound
To add an Event to a Sound, follow these steps.
NoteThese steps are exactly the same for adding Buttons.
1.In the View by Destination tab, expand the Sound folder. The available Sounds are displayed.
2.Click on the Sound to which you want to add an Event to make it active. Sounds themselves can be expanded to show which, if any, Buttons and Events have already been assigned to them.
NoteThe Details pane populates with the configurable attributes of the Sound. You have the option of editing the Sound message, destination, and so on, using the Details pane.
3.Click the Select Event(s) button at the top of the page. The Select Event(s) to [Sound name] dialog opens.
Figure 182: Add Event(s) to a Sound Steps
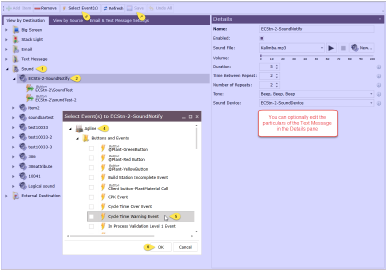
4.Expand the facility hierarchy. The Buttons and Events folder and the available lines are displayed.
Depending on where the Event or Button you want to add resides, you can:
a.Expand the Buttons and Events folder of the facility itself;
b.Expand a Line to view and expand its Buttons and Events folder; or
c.Expand a Station to view its Buttons and Events
5.Select a single Event by clicking it, or multiple Events by clicking their associated check boxes.
6.When you have finished selecting the Event(s) you want to add to the light, click OK. The Event or Events are added to the hierarchy of the Sound.
7.Click the Save button at the top of the page to make your changes permanent.
Adding Events and Buttons to an External Destination
To assign an Event (or Button) to an External Destination, follow these steps.
1.On the SmartBuild panel, select Notifications. The Notifications workspace opens and displays your facilities.
2.In the View by Destination tab, expand the External Destination folder to view its hierarchy.
3.Select the External Destination you want to work with.
4.Click the Select Event(s) button. The Select Event(s) to [source name] dialog opens.
5.Expand the hierarchy of Lines and Stations to locate the Event or Button you want to use to send a notification to the External Destination, and select that Event.
Figure 183: Select Event(s) dialog
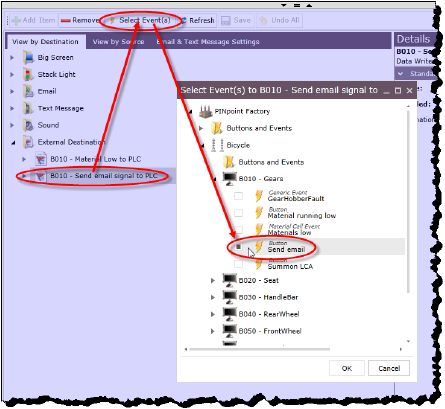
6.Click OK. The Event is assigned to the External Destination.
7.Click Refresh to reload the External Destination into the PINpoint system.
For information on setting up and configuring an External Destination, see Heading2 in the How Do I... chapter of this manual.
Once the Events and Buttons are created and BigScreen devices are configured, they need to be brought together. Events and Buttons are applied to BigScreen devices to arm and actuate the Andon system.
The assignment of Events and Buttons to notification destinations is accomplished in the Notifications page of SmartBuild.
About Backgrounds and Items
Backgrounds and Items are the objects available to accept Events and Buttons in a BigScreen notification destination.
Figure 184: BigScreen objects
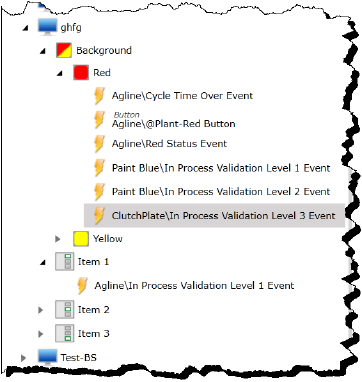
Each BigScreen features a Background, which itself offers Red and Yellow background change states. Each of these states can accept input from Buttons and Events that are not momentary (i.e., reflect an ongoing change of state, e.g., exceeding the warning time allotted for a process; and not simply a momentary event, e.g., a user logging into the system). When a user presses a Button or an Event sends a trigger keyed to one of these two destinations, the background of the BigScreen will change from its default color to either red or yellow respectively, immediately alerting the viewers that attention is required. If no Event or Button is added to these destinations, then the background will always display the default color.
Each BigScreen also features three Items, which are areas configured to display status information for whatever Events or Buttons have been added to them. An Item can have a maximum of one Event or Button assigned to it. The Item, displayed on the BigScreen, will display the solid/flashing colors configured to the Event or Button’s status, and the caption describing the status.
Adding Events and Buttons to a Background
To add an Event to a BigScreen’s Background, follow these steps. (Note that these steps are exactly the same for adding Buttons.)
1.In the View by Destination tab, expand the BigScreen folder. The available BigScreen’s are displayed.
2.Expand the BigScreen to which you want to add an Event.
You will notice that there are two different kinds of objects grouped in the hierarchy of a BigScreen. These are the Background and the Items.
3.Expand the Background to view the Red and Yellow background colors.
4.Click on the background color to which you want to add an Event to make it active.
5.Click the Select Event(s) button at the top of the page. The Select Event(s) to [background color] dialog opens.
Figure 185: Add Event(s) to a Background Steps
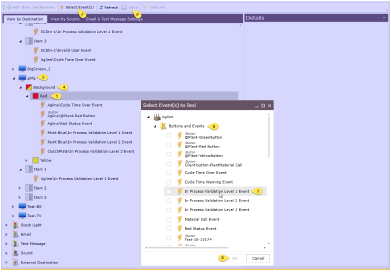
6.Expand the facility hierarchy. The Buttons and Events folder and the available lines are displayed.
Depending on where the Event or Button you want to add resides, you can:
a.Expand the Buttons and Events folder of the facility itself;
b.Expand a Line to view and expand its Buttons and Events folder; or
c.Expand a Station to view its Buttons and Events
7.Select a single Event by clicking it, or multiple Events by clicking their associated check boxes.
NoteOnly those Events (and Buttons) that have a status configuration and are non-momentary appear in the list of available choices.
8.When you have finished selecting the Event(s) you want to add to the background color, click OK. The Event or Events are added to the hierarchy of the background color.
9.Click the Save button at the top of the page to make your changes permanent.
Adding Events and Buttons to an Item
To add an Event to one of a BigScreen’s Items, follow these steps. (Note that these steps are exactly the same for adding Buttons.)
1.In the View by Destination tab, expand the BigScreen folder. The available BigScreens are displayed.
2.Expand the BigScreen to which you want to add an Event.
You will notice that there are two different kinds of objects grouped in the hierarchy of a BigScreen. These are the Background and the Items.
3.Click on the Item to which you want to add an Event to make it active.
4.Click the Select Event(s) button at the top of the page. The Select Event(s) to Item [number] dialog opens.
Figure 186: Add Event(s) to an Item Steps
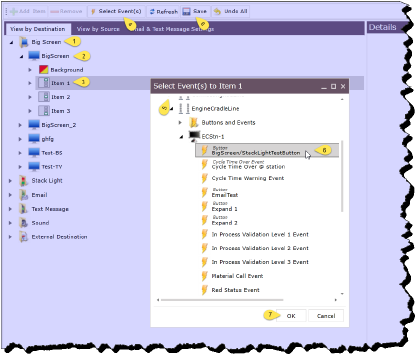
5.Expand the facility hierarchy. The Buttons and Events folder and the available lines are displayed.
Depending on where the Event or Button you want to add resides, you can:
a.Expand the Buttons and Events folder of the facility itself;
b.Expand a Line to view and expand its Buttons and Events folder; or
c.Expand a Station to view its Buttons and Events
6.Select a single Event by clicking it. Items can only take a single Event.
NoteIt is possible to remove a selected Event or Button by selecting it and clicking Remove at the top of the page. This frees the Item up to take a different Event or Button.
7.When you have finished selecting the Event you want to add to the Item, click OK. The Event is added to the hierarchy of the Item.
8.Click the Save button at the top of the page to make your changes permanent.